A large number of people who are a newbie to the web designing industry and are exploring how to start a blog or a new website are unaware of how to use their domain features. Therefore, we at Amritsar Digital Academy, the best digital marketing institute in Amritsar, help you with a detailed guide to set up an email account that uses your domain name.
There might be a number of times, when you would have visited a website, such as www.something.com and when you land on the Contact Us Page, you would find an email address, something like ‘username @gmail.com’ or ‘username@yahoo.com’. Although it is not the primary reason to measure the quality of a business, an ordinary person might think, that keeping a personal email address on an official site is not at all professional.
So, there is definitely a need for professional email id to showcase professional competence.

Now the challenge is, how to use the domain name to create an email address that is free with the hosting account. Mentioning an email address, such as username@domainname.com looks much more professional in contrast to the personal email, and the upside is that it is for free.
Cutting a long story short, if you have bought a domain name from the best domain registrars that provide free email accounts. Also, you can set up an email account on your domain name from the CPanel, offered to you by your hosting provider. They too offer a minimum 1 free email address for your account.
Below-given are the simplest steps on how to create an email address, using your domain name. This will certainly do good to your website and also enhance customer interaction. Before, landing onto the process, let’s get acquainted with what is email forwarding.
Concept of Email Forwarding
Email forwarding is a concept that enables the incoming mail to a domain related email address, such as info@domainname.com, to be reoriented to another email id, such as mehak@gmail.com. This concept is the easiest of all the ways to set up an email account without altering your email program.
Forwarded email addresses are often called ‘aliases’. It is the term used for another name that identifies with a given person. In the example listed below, Mehak has an email id on Gmail- mehak@gmail.com. She just bought the domain name ediblewebtech.com and creates a forwarding rule that reads: As soon as an email comes to info@ediblewebtech.com, it will be forwarded to mehak@gmail.com. In the discussed case, the email address info@ediblewebtech.com is an alias for mehak@gmail.com, since all the emails are transmitted to the same Gmail address.
Set up an email account that uses your domain name
As we probe further, this post by Amritsar Digital Academy discloses the steps to set up a new email address, such as info@ediblewebtech.com, and incorporate it into your Gmail account. This is the easiest way to send and receive emails through the Gmail portal, but your end-user will see your domain name email address.
The following steps have been divided into two parts.
Firstly, we will make you learn how to create a domain email address.
Also, learn how to link your domain’s email address with your Gmail account (or any other email id on some other email platform).
1. Create your domain name and the email address.
- Log into the Control Panel or CPanel of your website hosting account.
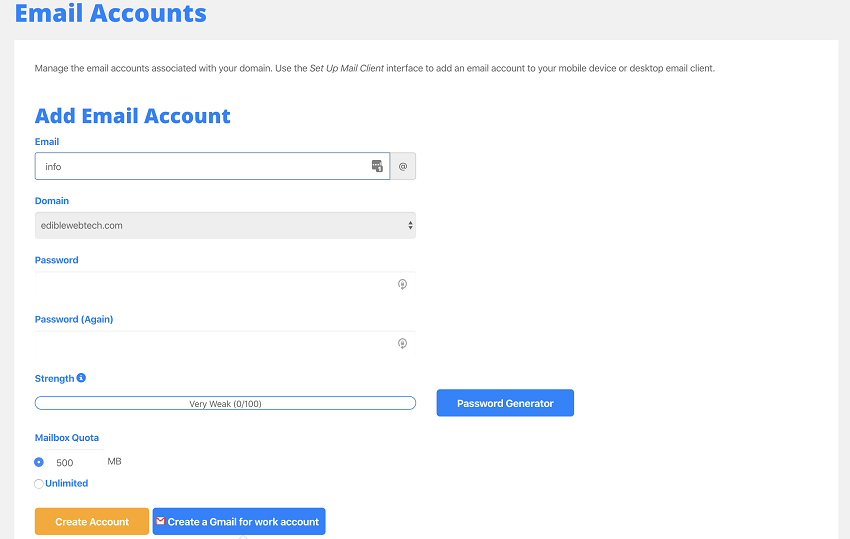
- Select the Email Accounts option, within the Email Section
- Now Select Add Email Account
- Fill in the details for your the newly created account
- Click Create Account as displayed in the image below.

- There appears a notification on your screen saying something like; ‘Your Account has been created successfully’.
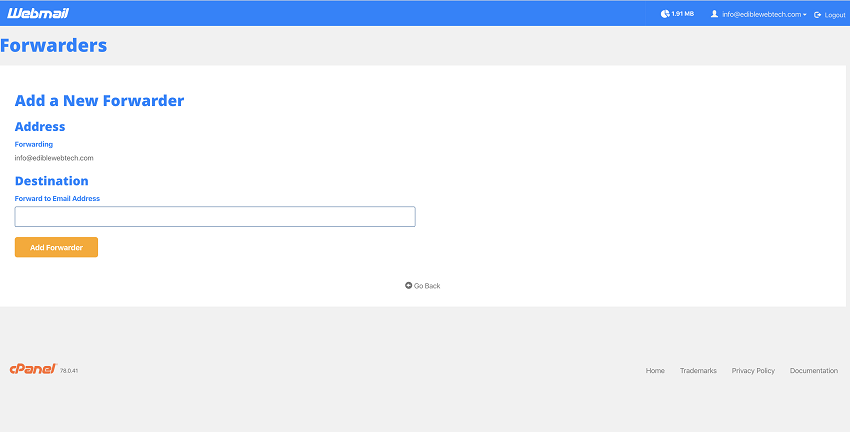
- Open the CPanel once again and select open the ‘Forwarders’ option in the Mail Section. Select the option ‘Add Forwarder’.
- Complete the details as shown in the image below. Now click on the ‘Add Forwarder and you are good to go.

Now every email sent to the info@ediblewebtech.com will be forwarded to your personal email id.
2. Merge your newly customized domain email with your Gmail account
- Log into your Gmail account.
- Go to Options>Mail Settings> Accounts and Imports.
- Check to Send Mail As and click on the Add Another Email Address option, that you own.
- Enter the details in the Popup that appears. Add the new domain email address that you have just set up. Click on the option ‘Next’.
- Select the option ‘Send Verification’ to verify the email address.
- Click on the verification link, sent to your email id.
- Select ‘Compose Email’ and look for the changes that you have made in the action.
Conclusion
Being the best digital marketing institute in Amritsar, Amritsar Digital Academy helps you learn domain and hosting set up. This post lays down a stepwise guide to set up an email address that uses your domain name. So, just follow every single step mentioned above to create a new professional or customized email id, hassle-free.
So, go get started…..


